
MOQ 100PCS
How Puff Print Hoodies Are Actually Made
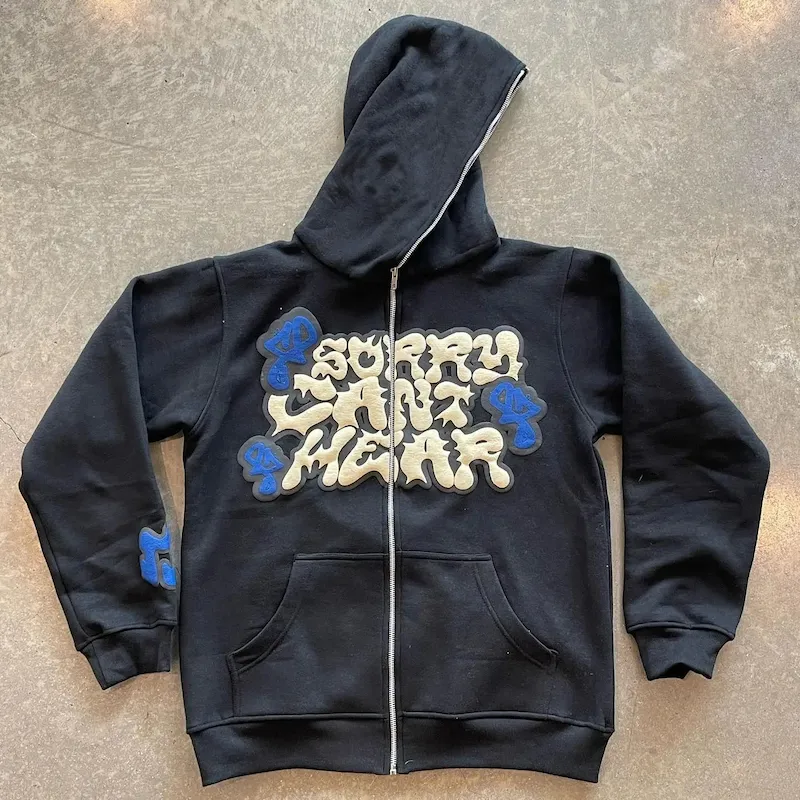
The puff print hoodie is everywhere right now. Scroll through any streetwear drop and half the rack has graphics sitting up off the fabric, raised and soft, a little squishy if you press them with your thumb. It is the single most requested finish coming through our Guangzhou production base over the past two years.
Here is what it actually is. Puff print is a variant of screen printing with a foaming agent mixed into the ink. The garment runs through a heat tunnel at around 160°C, the agent expands, and the design rises off the surface. You get relief without stitch lines. Somewhere between a flat print and embroidery, closer to the print side.
What happens on the production floor
The ink is the whole game. A standard screen print ink lays flat and cures flat. Puff ink carries a blowing agent that only does its job inside a narrow temperature window, and that window is smaller than most people expect.
Too hot and the foam over-expands. You get a rough, cracked surface that looks cheap and feels worse. Too cool and it barely rises, so you have paid the puff premium for something that looks like a slightly thick flat print. Our print operators run test strips on scrap fabric before every single puff batch to dial in the dryer. Skip that step and you are gambling with the whole run.
The good news for buyers: it works on any fabric color, and once it is cured right, it holds up through repeated washing. The texture is durable. The application is fussy.
The fabric matters more than the ink
This is the part first-time buyers miss. Puff print needs a fabric heavy enough to carry the raised ink without the whole panel looking flimsy. Heavyweight cotton fleece supports it. Thin jersey does not.
We work mostly with 300gsm cotton fleece and 280gsm French terry for puff hoodies and sweatshirts. Those are the same bases we ran for a US craft brewery client across six product styles, and the puff sat clean and full on every piece. Put the same design on a 180gsm summer-weight jersey and it looks sad. The fabric collapses around the print instead of framing it. Do not bother. If your blank is that light, switch the design to flat print or move up to a proper fleece weight.
This is also why the puff print hoodie took off the way it did. The garment people reach for puff on is already heavyweight, so the fabric is doing you a favor.
What it costs versus flat printing
Puff print runs about 20 to 30 percent more than standard water-based screen printing. Two reasons. The ink formulation is more expensive, and the curing needs tighter control, which means slower line speed and more operator attention.
There is also the screen charge. Like any screen print, each color needs its own screen, and that setup cost gets spread across your order. At our 100-piece minimum per style per color, a single-color puff logo spreads the screen charge thin enough that the per-piece premium stays small. The fewer pieces you order, the more that fixed cost bites.
We are not the cheapest puff print hoodie factory you will find, and we will tell you that upfront. What you are paying for is the calibration discipline above, so your bulk run actually matches the sample you approved.
Puff print, embroidery, or flat screen: which one
Buyers comparing a puff print hoodie against embroidery and flat print almost always want the same quick framework. Here it is:
| Finish | Best for | Relative cost |
|---|---|---|
| Puff print | Bold shapes, chunky lettering, soft 3D texture | Low to mid |
| Embroidery | Fine detail, durability, a more formal look | Mid to high |
| Flat screen print | Tight detail, lowest cost, no texture | Low |
One design rule that saves grief: puff loves big, bold, simple shapes and thick lettering. It hates fine detail. A tiny serif logo or thin script in puff print turns to mush after curing, because the foam rounds off every edge. If your artwork lives or dies on fine lines, go embroidery or flat print and keep puff for the parts that can carry weight.
The combo that reads expensive
The best-looking custom puff print hoodie usually layers two finishes, not one. Our favorite, and the one we recommend most to brands moving up from a basic single-technique drop, is puff print on the main logo with flat print on the smaller secondary text.
That contrast between raised and flat on the same garment is what makes a design feel built rather than slapped on. It costs a little more than a single print pass, and it is worth it almost every time.
How we run a puff print hoodie order
Send us your artwork and the blank you have in mind. First thing we do is check the fabric weight and flag it if the puff will not hold. Then a pre-production sample in 5 to 7 working days, with a test strip to lock the dryer settings before we touch your good fabric.
Once you approve the sample, bulk runs 10 to 15 working days for orders under 1000 pieces. We print on a water-based base by default, the same call our brewery client made when they rejected anything with a heavy plastic hand feel. One contact handles your order start to finish. If you want the full sequence, it is laid out in our step-by-step custom production process.
Quick care note worth passing to your customers: wash puff inside out, cold, and never iron directly on the design. The foam does not love a hot plate pressed flat against it.
If you have a design and you are not sure puff is the right call, send it over and we will tell you straight whether it will hold or whether you are better off with embroidery or flat print. Email jessie@gzgoodley.com and we will come back with a quote inside 24 hours.